Secrets of Hand-Holding
by Joseph Morlan
Most people who are serious about digiscoping use an adapter to attach the camera to their spotting scope. Several
scope manufacturers sell adapters specifically made for their scopes and which work with a variety of cameras.
There are also a variety of home-made adapters available. One reason adapters have become almost universal is that
attempts to hand-hold a camera to a spotting scope, often result in blurry, unsatisfying images. Much of this blurriness
can be eliminated by using an adapter which centers the camera to the scope eyepiece, and holds the camera steady.
However, there are ways to eliminate blurriness without using an adapter if you select the right equipment and
give up certain bad habits. I believe some of these "secrets" can also significantly improve digiscoping
results with an adapter as well as without one.
Here are my "secrets," learned by experience:
1. Use a fixed power wide-angle eyepiece on your scope! Zoom eyepieces introduce optical problems that are
hard to eliminate. Fixed power eyepieces can offer a field of view wide enough to reduce vignetting substantially
without sacrificing image quality.
2. Use an angled eyepiece. It is awkward to hand-hold a camera up to a straight-through eyepiece. An angled
eyepiece allows gravity to help center and stabilize a handheld camera. An angled eyepiece also allows use of a
smaller, lighter tripod without sacrificing stability. More on this below.
3. Use a scope with ED (extra-low dispersion) glass or equivalent. Digiscoping is a kludge, and you cannot
afford to lose any of the color or brilliance because of inferior optics. ED glass is very expensive, but well
worth the extra cost if you plan to use your scope for digiscoping.
4. Do not zoom your camera! Zooming your camera can eliminate vignetting, and give you a larger image, but
it introduces other, more serious problems. You are far better off suffering with some vignetting than you are
trying to get a better picture by zooming. A zoomed camera, including optical zoom, will almost invariably produce
an inferior picture because it reduces the amount of light reaching the camera sensors, reduces depth of field,
and makes your rig more sensitive to motion blur.
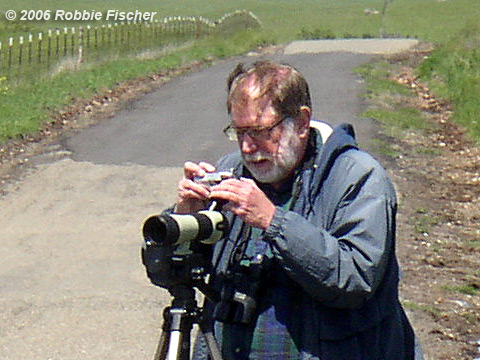
5. Find a camera that matches your scope/eyepiece combination. Once you have settled on the eyepiece you
are going to use, you need to select a camera that fits. Take your scope to the camera store and try out various
cameras until you find one that works for you. Use a pinch-grip to hand-hold the camera over the scope (see photo).
Ideally, the camera lens should center easily over your eyepiece without touching the glass and should produce
a full, non-vignetted image at 1X camera power. There is no shortcut to predicting which camera will work with
your scope and eyepiece other than trying until you find a good match.
6. Get closer to the bird. Although digiscoping offers photo opportunities of distant birds that would
not be possible any other way, it really shines when you are close. Zooming is not the answer. Zooming is the problem.
If you have a heavy scope/tripod combination it can be clumsy or difficult to move your setup to close the distance
to the bird. But a more lightweight combination afforded by an angled eyepiece (see photo) allows more flexibility
and agility in approaching the bird or adjusting your position for better light angle.
7. Do not raise the elevator on your tripod. A lightweight tripod with the elevator (central post) all
the way down is usually more stable than a heavy tripod with the elevator raised. If you crank up the elevator
on any tripod you will create a less stable mount. Buy a tripod with long legs so you can use it without raising
the elevator.
8. Take lots of pictures. Start shooting as soon as feasible and keep shooting until the bird is gone.
If your camera uses auto-focus, some photos will be better than others even if nothing has changed between shots.
Auto-focus is an inexact technology and is particularly sensitive when digiscoping. There is no film to waste,
so take lots of pictures and you will increase your chances that some of your photos will be keepers.
9. Learn to use photo editing software. In this digital age, you are not just a photographer, you are
also the developer. An advantage of digital photography is that you control the development process (usually called
post-processing). Most images can be improved by photo editing software. There are many biases that can be introduced
by lighting and camera anomalies. The goal is to correct these. Different kinds of editing may be needed depending
on whether you intend to display your images on the web or create prints. Most photo editing software is complex
and includes features you may never need. Basic photo editing involves learning how to crop, resize, adjust contrast,
adjust levels, adjust color saturation, adjust shadows & highlights, and sharpen (use unsharp mask if available).
The ultimate goal is always to make your photo appear as close as possible to the way the bird looked in life.
If anybody is interested, I have several albums of digiscoped bird and wildlife photos, all taken hand-held at::
http://fog.ccsf.edu/~jmorlan/trips.htm, and at http://fog.ccsf.edu/~jmorlan/newgallery.htm.
Happy digiscoping!