You will find this week's topic in Lesson 16 of the textbook
Macros is all about programming so you if you haven't had any exposure to programming, you will find this topic very different from anything you have done before. You will be forced to now think like a computer. The logic of all those complex functions that came before, will surely have prepared you for this kind of thinking. So do not fear.
Macros are created to automate repetitive tasks. So any activity that you find repetitious, you should create a macro to perform it.
Recorded Macros:
This first type of macro is common in other programs as well, such MS WORD. The programming code is created by literally recording your movements on the screen. The exact mouse clicks, keyboard actions, and cursor movement. You then save the steps, and run the macro whenever you need by using either:
the name you assigned it
or use the shortcut key combination you assigned to it
or you can even attach it to an interactive button on the screen and click it
or you can add it to the tool ribbon and click that.
Before you can create macros, you must first activate the Developers Tab on the tool ribbon if it isn't already there. To do this just follow these steps:
File, Options, Click Customize Ribbon (7 selections down), and on the far right panel, check the box Developer (3 up from the bottom), click OK and you will see the new Developers tab on the tool ribbon, on the end, at the far right. Select it.

Before we begin, select cell A1 of a new workbook.
You will focus on the tools in the first section - the Code category. To begin recording a macro, click the Record Macro tool. Be aware that when you are done recording, YOU MUST REMEMBER TO STOP THE RECORDING. It doesn't matter how much emphasis I place on this, you will forget - at least sometimes, and your macro will fail. When this happens, you will get a Runtime error when you try to run it. Just delete the macro, and start over.
After clicking the Record Macro tool, fill in the dialog box as shown:
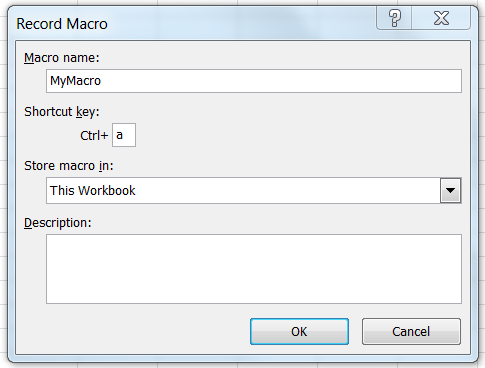
The name can be anything but no spaces allowed. Also stay away from Excel words (commands). Supply a shortcut key to run the macro. Note that the key combination I chose, <ctrl>+<a>, will no longer mean select all! If you want to keep the original meanings of Excel shortcut keys, choose different ones.
In the Store Macro in list, there are 3 options. I chose to store the macro I am about to create, in the same workbook I currently have open. You could choose another new workbook or in the future, you will more likely choose Personal Macro workbook. This last option will create a special type of workbook, named Personal, and it will be stored in a special place in the Excel system folder. This will allow this specially named workbook to automatically open every time Excel starts! This is because the workbook that contains the macro you want to use, must be open in order to be able to use the macro! So by choosing this, you won't have to remember to open the workbook containing your past macros. Plus, all future macros will automatically be stored in the personal workbook! A very nice convenience indeed. But we won't use it right now, especially if you are not on your own computer.
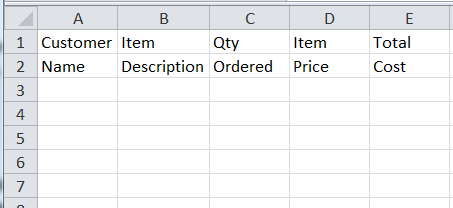
We are going to attempt to make a macro that will create a work area for us that we are required to do every single day (let's pretend. And let's pretend it's a large work area with lots of headings). It will look like this when done.
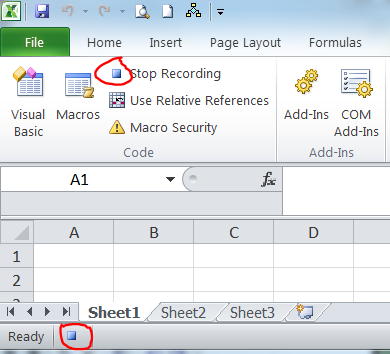
Once you click OK, the macro is immediately in record mode, and two Stop Recording tools show up on the screen (see image below). Everything you do now is being carefully and exactly recorded. You are currently in cell A1 as directed at the start of this section (if not, stop the recording and start over).
Type Customer, move down, type Name, move over and up, type Item, move down, type Description, widen the Description column, move over and type Qty, move down and type Ordered etc. It should look like the image above when done. Be sure to stop the recording by clicking either of the highlighted tools which appeared when the macro went into recording mode!
Test your macro
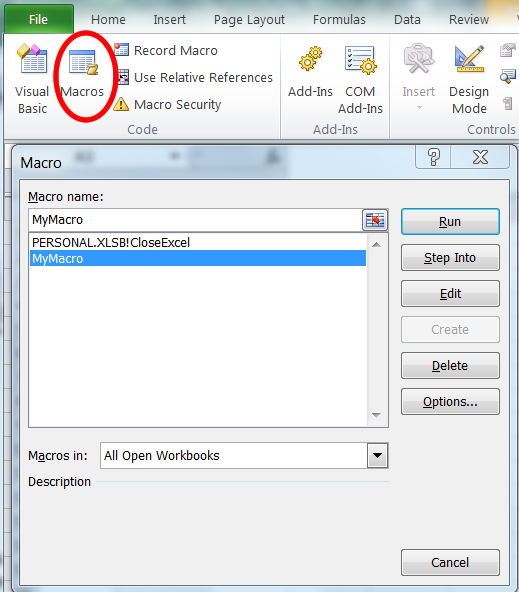
Erase all the data you just typed. With the cursor in cell A1, press <ctrl>+<a>. Like magic, the work area is created. A very short and simple demonstration of a recorded macro, but it makes the point. You can make a recorded macro for anything you can already do with the mouse and keyboard, no matter how complex. Just be careful when recording. It's a good idea to go through the steps first before recording macro. You can also run your macro by clicking the Macro tool on the ribbon and choosing from your list of macros, and then clicking Run:
Now select any random cell other than A1. Run your macro. Hmmm... what is wrong with the macro? Why isn't it perfect? What did we miss when creating the macro?
To solve this, ask yourself "What was the very first instruction you gave the macro?" The very first! No! The very first instruction was type Customer. Then move to cell A2 and type Name. Get it? The very first instruction should have been - go to cell A1 and then type Customer! I am doing this to get you to see why thinking like a computer is so important in programming, so put up with me for a bit longer.
Let's examine the programming code that is making this happen. Click the Macro tool, from the list, select your macro, then click the Edit button.
You will now be thrown into a new secret world called the Visual Basic Editor.
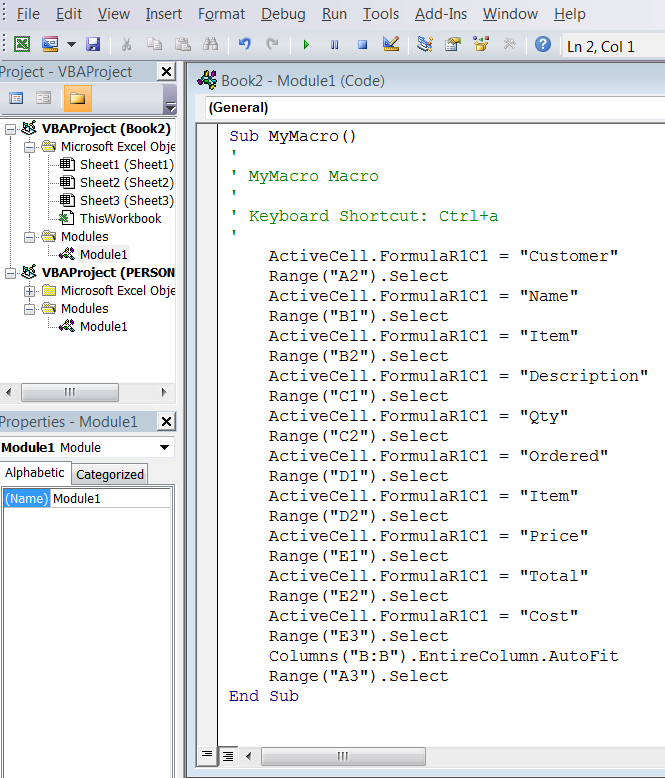
Explanation of Visual Basic Code:
Visual Basic is a programming language. Microsoft chose this language for it's newer versions of software. It is a special version of Visual Basic, called VBA - Visual Basic for Applications, and is used in all of its software.
All macro programs (recorded and Keywords) are called subroutines and will begin with the word Sub, and end with End Sub. They will always be blue. Any lines preceded by an apostrophe, turns the line green and indicates that the line is a comment, and is to be ignored by the program.
By just staring at the code for a bit, It doesn't take long to understand the meaning of the code.Of course we are happy to not ever have to type this in. But sometimes you need to make some simple fixes and so it's worth understanding the meaning so instead of re-recording a very long set of steps, you can instead quickly make some editing changes.
Obviously the words Range("A3").Select is how you move to a desired cell. And the words ActiveCell.FormulaR1C1 (row 1 column1) is how you shove something into a cell. So let's fix our mistake by adding the missing command to the top. Yu can simply copy and paste one of the similar lines of code and then edit it to say A1 like mine shows:
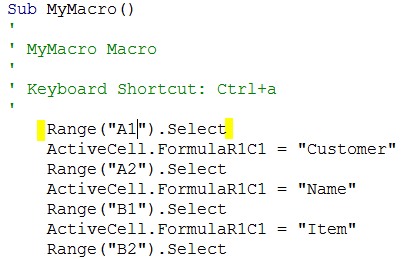
Return to Excel by clicking the top red X in the Visual Basic window. Don't worry, you will not close Excel.
Erase the data. Select any random cell other than A1. Run your corrected macro <ctrl>+<a> and Voila! It works perfectly now. How cool is that?
A More Flexible Macro
Suppose we wanted to have the same work-area but not always in the same place, A1 to E2. As you saw in the VB code, the cell addresses were very specific. A1, A2 etc. so let's do the exact same steps to record a new macro, with a new name and a new shortcut. But this time, before you start the recording, click the very important tool labeled Use Relative References.
Start by erasing the data in the work-area. click the Use Relative References to activate it (it will turn yellow). Click the Record Macro button. Once you have clicked OK in the Macro dialog box and the recording has begun, you can type the same data as before in the same place if you want. Stop the recording. Now click in any random cell, run the macro, and it will appear where your cursor is. You can repeat this over and over again and it will always work!
Examine how different the code looks for an Absolute reference Macro vs. a Relative Reference macro.
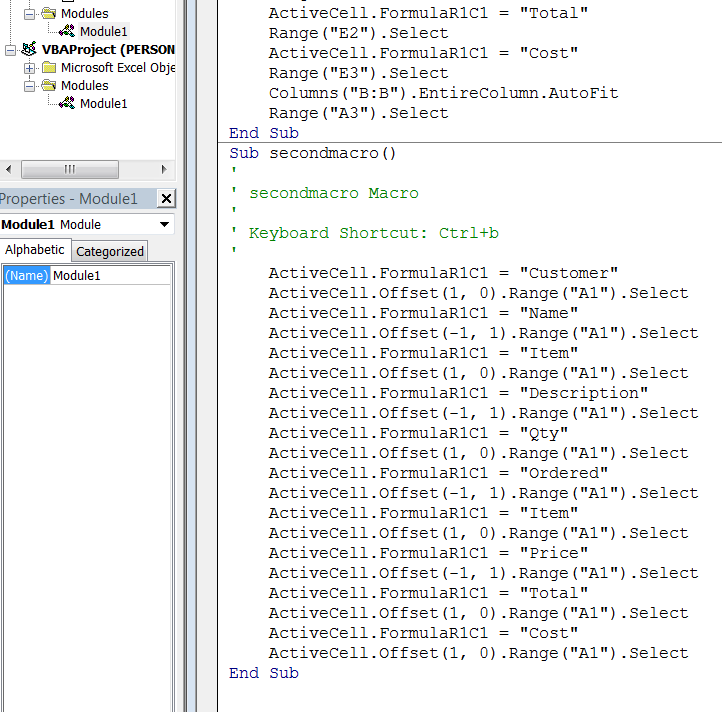

In the Relative Macro, references to cells are not exact, it is done by using ActiveCell.Offset(1, 0).Range("A1").Select which means, down 1 row, stay in same column, or ActiveCell.Offset(-1, 1).Range("A1").Select which means up one row, over one column. The coordinates are always Row,Column and the positive numbers means forward, and negative numbers mean backwards.
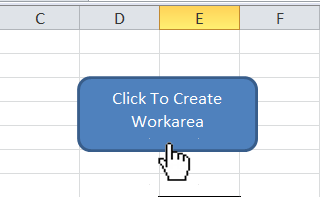
To execute a macro, you can click the macro tool and choose the macro from the list. You can use the assigned shortcut key, or you can attach the macro to a drawing object such as button. Just follow the steps below.
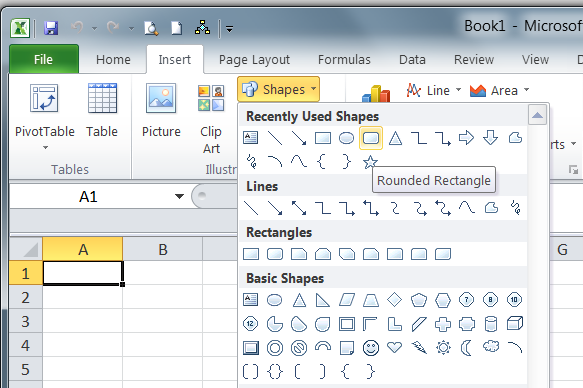
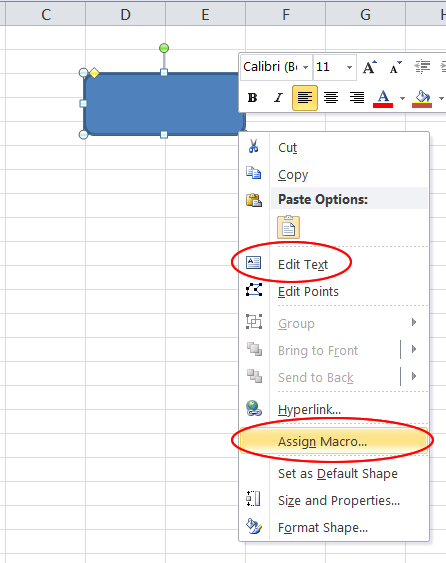
Select the Rounded Rectangle and draw a rectangle shape. The right-click the rectangle. Choose Edit to enter a label. Then choose Assign Macro to see your list of macros. Choose the macro to attach.
Test out your Button:
Project:
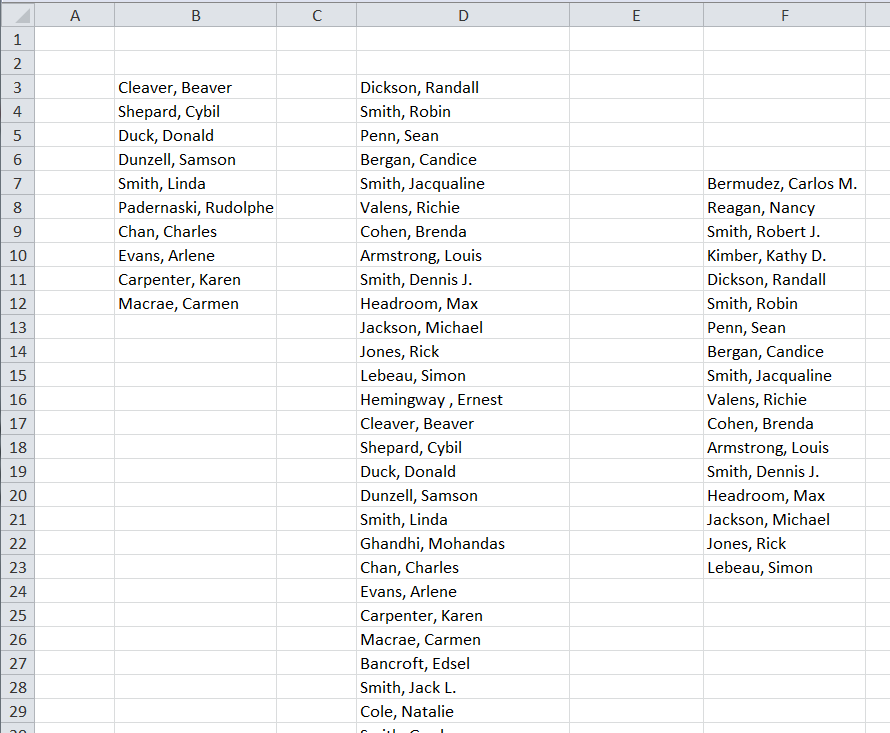
Create a recorded macro that will separate a list of names (Last, First) into two separate columns. The macro should be able to handle any length list and the list can be anywhere on the sheet. When the macro is completed, the user should be able to select the first cell in the list of names and just press the shortcut key and the list will automatically split into two columns
Example of List:
Next time we will look at Function Macros.
Macros is all about programming so you if you haven't had any exposure to programming, you will find this topic very different from anything you have done before. You will be forced to now think like a computer. The logic of all those complex functions that came before, will surely have prepared you for this kind of thinking. So do not fear.
Macros are created to automate repetitive tasks. So any activity that you find repetitious, you should create a macro to perform it.
Recorded Macros:
This first type of macro is common in other programs as well, such MS WORD. The programming code is created by literally recording your movements on the screen. The exact mouse clicks, keyboard actions, and cursor movement. You then save the steps, and run the macro whenever you need by using either:
the name you assigned it
or use the shortcut key combination you assigned to it
or you can even attach it to an interactive button on the screen and click it
or you can add it to the tool ribbon and click that.
Before you can create macros, you must first activate the Developers Tab on the tool ribbon if it isn't already there. To do this just follow these steps:
File, Options, Click Customize Ribbon (7 selections down), and on the far right panel, check the box Developer (3 up from the bottom), click OK and you will see the new Developers tab on the tool ribbon, on the end, at the far right. Select it.
Before we begin, select cell A1 of a new workbook.
You will focus on the tools in the first section - the Code category. To begin recording a macro, click the Record Macro tool. Be aware that when you are done recording, YOU MUST REMEMBER TO STOP THE RECORDING. It doesn't matter how much emphasis I place on this, you will forget - at least sometimes, and your macro will fail. When this happens, you will get a Runtime error when you try to run it. Just delete the macro, and start over.
After clicking the Record Macro tool, fill in the dialog box as shown:
The name can be anything but no spaces allowed. Also stay away from Excel words (commands). Supply a shortcut key to run the macro. Note that the key combination I chose, <ctrl>+<a>, will no longer mean select all! If you want to keep the original meanings of Excel shortcut keys, choose different ones.
In the Store Macro in list, there are 3 options. I chose to store the macro I am about to create, in the same workbook I currently have open. You could choose another new workbook or in the future, you will more likely choose Personal Macro workbook. This last option will create a special type of workbook, named Personal, and it will be stored in a special place in the Excel system folder. This will allow this specially named workbook to automatically open every time Excel starts! This is because the workbook that contains the macro you want to use, must be open in order to be able to use the macro! So by choosing this, you won't have to remember to open the workbook containing your past macros. Plus, all future macros will automatically be stored in the personal workbook! A very nice convenience indeed. But we won't use it right now, especially if you are not on your own computer.
We are going to attempt to make a macro that will create a work area for us that we are required to do every single day (let's pretend. And let's pretend it's a large work area with lots of headings). It will look like this when done.
Once you click OK, the macro is immediately in record mode, and two Stop Recording tools show up on the screen (see image below). Everything you do now is being carefully and exactly recorded. You are currently in cell A1 as directed at the start of this section (if not, stop the recording and start over).
Type Customer, move down, type Name, move over and up, type Item, move down, type Description, widen the Description column, move over and type Qty, move down and type Ordered etc. It should look like the image above when done. Be sure to stop the recording by clicking either of the highlighted tools which appeared when the macro went into recording mode!
Test your macro
Erase all the data you just typed. With the cursor in cell A1, press <ctrl>+<a>. Like magic, the work area is created. A very short and simple demonstration of a recorded macro, but it makes the point. You can make a recorded macro for anything you can already do with the mouse and keyboard, no matter how complex. Just be careful when recording. It's a good idea to go through the steps first before recording macro. You can also run your macro by clicking the Macro tool on the ribbon and choosing from your list of macros, and then clicking Run:

Now select any random cell other than A1. Run your macro. Hmmm... what is wrong with the macro? Why isn't it perfect? What did we miss when creating the macro?
To solve this, ask yourself "What was the very first instruction you gave the macro?" The very first! No! The very first instruction was type Customer. Then move to cell A2 and type Name. Get it? The very first instruction should have been - go to cell A1 and then type Customer! I am doing this to get you to see why thinking like a computer is so important in programming, so put up with me for a bit longer.
Let's examine the programming code that is making this happen. Click the Macro tool, from the list, select your macro, then click the Edit button.
You will now be thrown into a new secret world called the Visual Basic Editor.
Explanation of Visual Basic Code:
Visual Basic is a programming language. Microsoft chose this language for it's newer versions of software. It is a special version of Visual Basic, called VBA - Visual Basic for Applications, and is used in all of its software.
All macro programs (recorded and Keywords) are called subroutines and will begin with the word Sub, and end with End Sub. They will always be blue. Any lines preceded by an apostrophe, turns the line green and indicates that the line is a comment, and is to be ignored by the program.
By just staring at the code for a bit, It doesn't take long to understand the meaning of the code.Of course we are happy to not ever have to type this in. But sometimes you need to make some simple fixes and so it's worth understanding the meaning so instead of re-recording a very long set of steps, you can instead quickly make some editing changes.
Obviously the words Range("A3").Select is how you move to a desired cell. And the words ActiveCell.FormulaR1C1 (row 1 column1) is how you shove something into a cell. So let's fix our mistake by adding the missing command to the top. Yu can simply copy and paste one of the similar lines of code and then edit it to say A1 like mine shows:
Return to Excel by clicking the top red X in the Visual Basic window. Don't worry, you will not close Excel.
Erase the data. Select any random cell other than A1. Run your corrected macro <ctrl>+<a> and Voila! It works perfectly now. How cool is that?
A More Flexible Macro
Suppose we wanted to have the same work-area but not always in the same place, A1 to E2. As you saw in the VB code, the cell addresses were very specific. A1, A2 etc. so let's do the exact same steps to record a new macro, with a new name and a new shortcut. But this time, before you start the recording, click the very important tool labeled Use Relative References.
Start by erasing the data in the work-area. click the Use Relative References to activate it (it will turn yellow). Click the Record Macro button. Once you have clicked OK in the Macro dialog box and the recording has begun, you can type the same data as before in the same place if you want. Stop the recording. Now click in any random cell, run the macro, and it will appear where your cursor is. You can repeat this over and over again and it will always work!
Examine how different the code looks for an Absolute reference Macro vs. a Relative Reference macro.
In the Relative Macro, references to cells are not exact, it is done by using ActiveCell.Offset(1, 0).Range("A1").Select which means, down 1 row, stay in same column, or ActiveCell.Offset(-1, 1).Range("A1").Select which means up one row, over one column. The coordinates are always Row,Column and the positive numbers means forward, and negative numbers mean backwards.
To execute a macro, you can click the macro tool and choose the macro from the list. You can use the assigned shortcut key, or you can attach the macro to a drawing object such as button. Just follow the steps below.

Select the Rounded Rectangle and draw a rectangle shape. The right-click the rectangle. Choose Edit to enter a label. Then choose Assign Macro to see your list of macros. Choose the macro to attach.

Test out your Button:

Project:
Create a recorded macro that will separate a list of names (Last, First) into two separate columns. The macro should be able to handle any length list and the list can be anywhere on the sheet. When the macro is completed, the user should be able to select the first cell in the list of names and just press the shortcut key and the list will automatically split into two columns
Example of List:
Next time we will look at Function Macros.