| sections in this module | City
College of San Francisco - CS260A Unix/Linux System Administration Module: Filesystems I |
module list |
Partitioning
The standard definition of partitioning is:
Partitioning is the process of dividing a physical device into multiple pieces, each of which can contain a separate filesystem. Essentially, partitioning takes one physical device and makes it look like several.
Partitioning occurs by the modification of the disk's partition table. This table is used by the operating system to tell which parts of the disk to use. Thus, even if a disk has only one filesystem, it must be partioned - in this case into a single partition - so that the operating system can locate the filesystem parameters and the filesystem itself. The partitions described in the partition table are physical partitions, which are also called hard partitions.
The partition table itself is very simple. It simply indicates for each partition
The table is indexed by partition number. Thus, the first entry gives information about the first partition.
The partition table is part of the MBR (the master boot record). Since the MBR is fixed size (one disk block of 512 bytes), the size of the partition table is fixed and is severely limited. There is room for exactly four partitions. These four partitions are called primary partitions, since their parameters are in the partition table itself.
Many linux systems need more than four partitions. To facilitate this, when the fourth partition is allocated, instead of creating the partition as the last primary partition, the last entry in the partition table is used for the extended partition. The remainder of the disk is then allocated to this partition, and its sole purpose is to point to the next entry in the partition table. These later entries (whose first entry is indicated by the extended partition, and where the fourth partition's parameters are placed) are not in the MBR and are, unfortunately, referred to as logical partitions.
| Contents of Partition Table | Partition type |
| Parameters for the first partition (start location, size) | Primary |
| Parameters for the second partition (start location, size) | Primary |
| Parameters for the third partition (start location, size) | Primary |
| Location of the parameters of the first logical partition's parameters | Extended |
How the logical partition table entries are organized is somewhat implementation-dependent. They can either be together (in a second partition table) or each partition entry can be stored with the partition it describes. In this latter case, each partition entry describes both its partition and points to the next partition entry, so that the entries form a chain. The result is that the number of possible partitions are essentially unbounded. (However, some linux systems that generate device files at system installation only generate device files for 16 partitions per disk, which should be sufficient for one system.)
Note: the partition table appears in partitioning programs as one partition table, but, assuming there are more than three partitions, it is stored in two or more places on the disk.
At boot time, the system reads all the partition table's entries,
primary and logical, so any changes to its contents will not be
available until the partition table has been read back into the
kernel. The safest way to do this is to restart your system. If
this is inconvenient you can try the command partprobe and see if it
will get the partition table reread by the kernel. (At the time of
this writing, RHEL6 required reboot after modifying the
partitions. Previous versions allowed the use of the program partprobe to re-read the table.) Never attempt to access a new partition or remount
an existing partition until the partition table has been
re-read. Since the device for a new partition
will not exist until the kernel issues a uevent for the new
partition to udev, you will not be able to access a newly-created
partition anyway, but if you change the parameters of an existing
partition and do not reread the partition table you will have a
mess. Note that parted
may indicate that it read the partition table back in itself.
Don't trust it! Use partprobe
(f it works) or reboot after you exit parted.
It should be obvious by now how important the partition table is
and how disastrous it is if it is destroyed, updated erroneously
or deleted. The parameters in the partition table, although
simple, cannot be replaced (unless you save the information by
writing it down) and their loss involves loss of all of your data!
These simple parameters are used by the boot loader to find the
operating system, and then by the operating system to find the
other filesystems. Without your
partition table, your disk is a useless array of meaningless
bits.
I hope I have made my point. It is not a bad idea to take a picture or
just a text copy of your partition table and squirrel it away somewhere
(on another system!). We will revisit this at the end of this section.
Note: We traditionally have used fdisk to create partitions. fdisk is very simple, and the creation and labeling of the filesystem must be performed outside of fdisk, after the partition is created. In this section we will show both fdisk and parted. fdisk is easy, but it seems kind of flakey in RHEL6. parted is supposed to be better supported. It also supposedly provides capabilities to create and manipulate filesystems as well as partitions, but it is much better to use the standard system tools (such as e2label and mkfs) rather than parted to do the filesystem operations, and that is what these notes will do. In fact, when you try to use parted to perform such an operation, you get this warning:
WARNING: you are attempting to use parted to operate on
(check) a file system.
parted's file system
manipulation code is not as robust as what you'll find in
dedicated, file-system-specific packages like e2fsprogs. We
recommend
you use parted only to manipulate partition tables, whenever
possible.
Support for performing most operations on most types of file
systems
will be removed in an upcoming release.
We will show the use of both parted and fdisk in this section. See which one you like
better. Most users now used parted,
and consider fdisk a
bit outdated. We will use parted
in the exercises.
Preparing
to partition
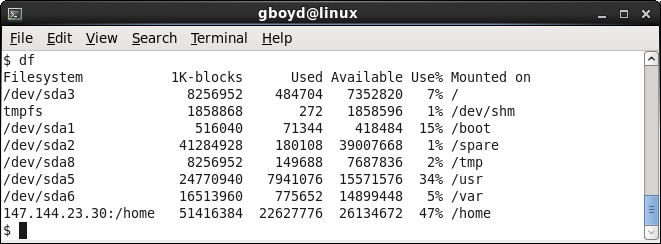
This illustration shows the output of df on one of the classroom linux systems. The system uses physical (hard) partitions. These partitions are all on the same disk (sda). Partitions 1,2,3,5,6, and 8 have filesystems and are mounted. In addition it shows a pseudo-filesystem, /dev/shm. We will discuss pseudo-filesystems later, but they have nothing to do with disk partitions. (df also shows NFS filesystems, which are mounted remotely from the server.)
The immediate question you might ask is: what happened to partition 4? From the previous discussion it should be obvious that partition #4 is the extended partition. Thus, the entry for partition four indicates the location of the first logical partition, partition 5.
You could also use the output of the mount command to retrieve information about what is mounted where:
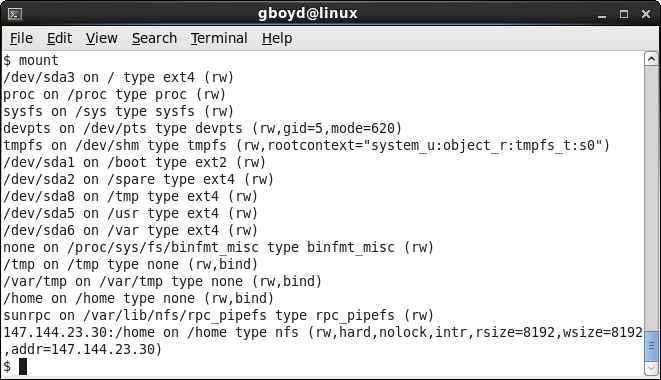
Here, more pseudo-filesystems show up. The output adds the filesystem type and omits the size information output by df. (Note: the mount command is in /etc on some systems.)
We will now look at an example of running fdisk on this disk. First, a few things you should know:
When fdisk starts, it outputs the following announcement and waits for a command:
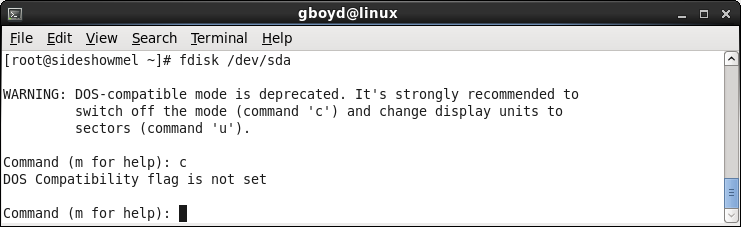
When we start fdisk, we see a warning.
By default, fdisk
uses old DOS rules for partitioning, which don't apply anymore. In
addition, it wants you to switch the display of locations to
sectors (blocks). The problem with the second option is that fdisk does not function
very well when using sectors - it gets confused about the huge
numbers required. (A 200GB disk will have nearly 500 million
sectors. ) So we will follow the suggestion of turning off
DOS-compatibility and keep the display in "cylinders", which we
will see are 8MB each.
Note: Old versions of the PC BIOS had problems booting filesystem if they did not begin (if their first block was not) within the first 1024 cylinders. This is pretty much a legacy issue today, but it is one of the reasons most linux systems want to create a special small partition as the first partition, and place the kernel and boot loader there (besides the fact that the kernel should be on a hard partition - not a partition under the control of the logical volume manager). As you can see from the output of the df command shown previously, this is true of the system we are using as a model. (See the /boot partition.)
At this point, fdisk is waiting for a command. There are lots of them, most of which you will never want to use. A few, however, are essential. The commands, with a terse description are listed under the 'help', which is retrieved by the non-intuitive command m (menu)
We will now look at the existing partitions on our disk by giving the command p
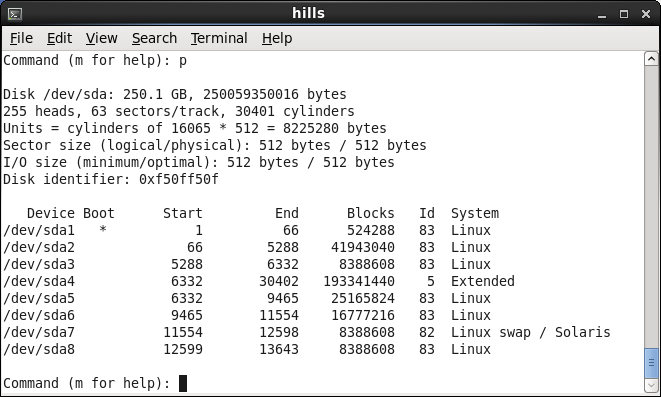
First, let's look at the disk statistics. fdisk tells you the size of the disk, that it wants to allocate space by cylinders, and what the size of a cylinder is. In this case, a cylinder consists of 16065 disk blocks of 512 bytes each, or just less than 8MB.
Next, it shows you the allocations so far. The starting and ending numbers are in cylinders. A sample calculation for the first partition (66 cylinders * 8MB/cylinder) results in 524MB. This indicates an annoying thing: the size of the 'Blocks' indicated here are 1024 bytes! This makes the output easier to read, but seems to conflict with using 512 byte basic disk blocks a few lines earlier. Thus, the size of the partition #5 is about 25GB, which agrees with the size of the /usr partition in the earlier output of df.
You should note two other things here: the first partition is marked 'bootable'. This is important for the BIOS. Also, there is an extra partition listed that was not in the output of df or mount: the linux swap partition, partition #7.
Assuming our task is to add a filesystem, a good next question would be 'how much space do we have?' To answer this, you must perform a calculation. There are a total of 30401 cylinders on this disk. The last cylinder allocated is 13643, so there are 30401-13643 or 16758 cylinders unallocated at 8MB/cylinder is about 131GB available.
Let's allocate a new partition of 20GB. Although you can specify the size to fdisk in MB (by adding the suffix M), we will use cylinders for practice. 20GB is 20*1024 MB or 20480MB. At 8MB/cylinder, this is 2560 cylinders:
Note the different ways you can put in the 'size' indicator. The
default is the number of the last cylinder, which in our case
would be 13463+2560-1. You can also indicate the partition size
using +N,
where N
indicates the size of the partition. If N is only a number, the
size is in cylinders. If N has the suffix M
(e.g., +1024M)
the size is indicated in MB. As you can see, fdisk's
calculation is a little different than we would expect here, since
+2560 should give the last cylinder of 13463+2560-1.

Assuming you were happy with this new information, you would then
$
ls /dev/sda*
/dev/sda
/dev/sda2 /dev/sda4 /dev/sda6 /dev/sda8
/dev/sda1
/dev/sda3 /dev/sda5 /dev/sda7 /dev/sda9
Using parted
You can run parted
in interactive mode or at the command-line. We will show the
interactive mode, as you get better feedback about what you are
doing. Remember, in both interactive and command-line mode, parted updates the
partition table as soon as you issue the mkpart command. If you
make an incorrect partition you must remove it before quitting.
If you prefer to use parted in command mode, simply give parted the disk device followed by the command in the same format as used in interactive mode. As an introduction to command-line operation we will briefly show the use of one command, print, which prints the partition table:
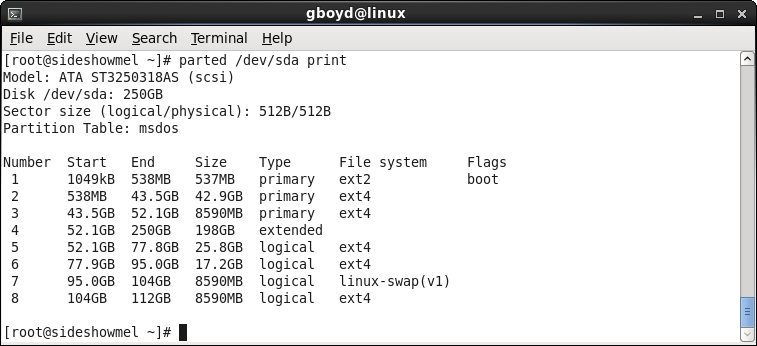
There are four important parted commands: print, mkpart, rm, and help. (You might also need unit to adjust the units. Note that the units above default to GB, which parted distinguishes from GiB, which is the power-of-two measurement.) You can get general help (help) or help on a command (help command). If you need to mark the partition as 'bootable' you will also need either the set or toggle command. We will create the same 20GB partition with parted that we created with fdisk.
First, let's get the syntax of the mkpart command:
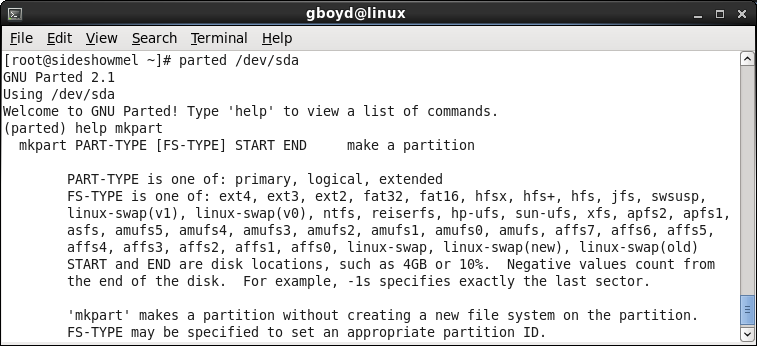
Now let's create the partition:
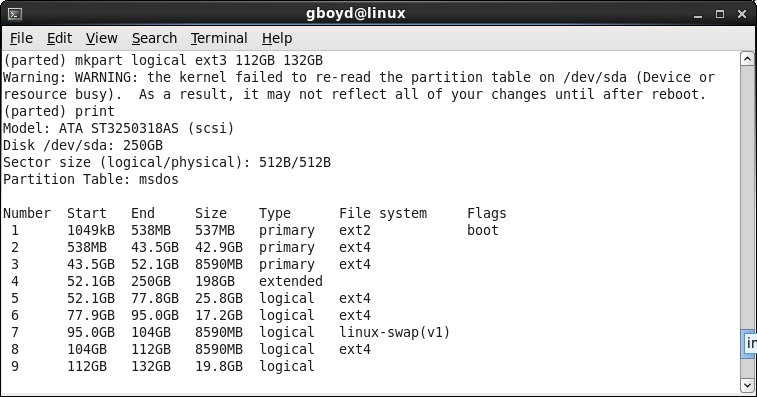
Note that the 'file system' type of ext3 was not added. I don't know why parted wants it, since there is no filesystem on the partition yet.
Question mode
parted will prompt you for input when using mkpart. All you have to type is mkpart. It will then prompt you for each input field. This is important, as it is the only way to specify the extended partition.
Remember, the last primary partition must be the extended partition. The remainder of the disk is allocated to the extended partition, then it is like you start partitioning all over again. In the illustration above, you will see that partition #4 (the last slot in the main partition table) is an extended partition, and it's size is the rest of the disk. After that, this extended partition is carved up into what are called logical partitions. In order to specify the extended partition, you must be able to reliably specify the end of the disk. In parted, this is specified as the last sector. The extension of sector is s, and the specification of "from the end backwards" in a size field is the prefix minus (-), so the last sector of the disk is -1s.
Thus, in our example above, you could have created the extended partition like this:
mkpart extended 52.1GB -1s
but this doesn't work (at least it didn't for me) - parted complains about the -1s size! Instead, you must use 'question mode' and specify each field one at a time.
Parsable (can be parsed) output
You can run parted from the command-line and make it produce parsable output. This output can then be taken apart to extract disk parameters for later parted commands. For example, suppose you want to create two same-sized partitions that take up the rest of the disk except for 100GB. The parted output
# parted -m /dev/sda print
BYT;
/dev/sda:500GB:scsi:512:512:msdos:ATA Hitachi HDS72105;
1:1049kB:538MB:537MB:ext4::boot;
2:538MB:13.4GB:12.9GB:ext4::;
3:13.4GB:22.0GB:8590MB:linux-swap(v1)::;
4:22.0GB:500GB:478GB:::;
5:22.0GB:194GB:172GB:ext4::;
6:194GB:207GB:12.9GB:ext4::;
7:207GB:218GB:10.7GB:ext4::;
8:218GB:226GB:8590MB:ext4::;
9:226GB:326GB:99.7GB:ext4::;
#
tells you that the last partition ended at 326GB and the size of the
disk is 500GB. You can do the arithmetic now from a script and generate
the mkpart commands.
Partitioning your system
When you are designing your partitions, you should observe the following guidelines:
Last, of course, you need at least a root partition. This can contain everything else. Alternately, it can be carved into two or three parts. Besides /, some people want users' home directories separate, as /home. As we mentioned previously, traditionally /usr was a separate filesystem, but this was originally due to limited device size (two physical drives were needed to provide sufficient space for the main system), so today it is mostly just habit. The more divisions you have, the more the chance one of them can run out of space.
If you have a large drive, leave a
significant amount of space unallocated for later use. Giving
linux more than 40 GB for a base system (excluding /tmp) is kind of silly, and many versions of linux
can exist quite happily in 10GB, or even less for a text-only system (no GUI). (This is not including the size
of your /home
or /tmp partition.)
One last note on partitioning: Once you
have your partitions set, run parted,
change the units to sectors, then print out the partition table and
save it in a file either on another computer or on paper. It could save
you some day. (You can use the 'sectors' measurement on any
partitioning program. If you lose your MBR, you should be able to
retrieve your existing filesystems by creating a new partition table
that exactly matches what is on the disk.)
| Preview question: The known filesystems on our linux systems are listed in fs(5). Review them briefly. Most of these filesystem types are not supported by our installation. To see a list of the filesystems currently supported, cat the file /proc/filesystems. Any filesystem listed with the prefix nodev is not supported in the running kernel. |
| Prev | This page was made entirely
with free software on linux: the Mozilla Project and Openoffice.org |
Next |