| sections in this module | City
College of San Francisco - CS260A Unix/Linux System Administration Module: Filesystems I |
module list |
Creating a filesystem is the process of dividing the space in a partition into areas for data, inodes, and bookkeeping information. It is erroneously called 'formatting' in the vernacular. It is more precisely called 'high-level formatting' or 'erasing'. Prior to creating the filesystem, the partition and the device file used to access it must, of course, exist. The parameters needed for the filesystem must also have been decided. This includes the filesystem type, the blocksize, and any special parameters.
Although the creation of other system-supported filesystems is similar, the specifics of this section will apply to the creation of an ext2, ext3, or ext4 filesystem.
Filesystem creation is the responsibility of the mkfs program. mkfs is not a single program. It is actually a front-end for a set of filesystem-creation programs, one per filesystem type. The most important options to mkfs are the filesystem type and the device file that indicates the partition on which the filesystem is to be created:
mkfs -t type [filesystem-specific parameters] device
The -t type option causes mkfs to invoke the appropriate filesystem-specific mkfs counterpart. These are named mkfs.type. Thus, the ext2 filesystem creation program is mkfs.ext2. (Each of mkfs.ext2, mkfs.ext3 and mkfs.ext4 is a link to mke2fs.) When the filesystem-specific version is started, it is given the filesystem-specific parameters.
For our discussion, we will concentrate on mke2fs (remember, this is used for ext2, ext3, and ext4). Here are the important options:
All data, of course, will be destroyed on the partition (unless the -n option is used), and the partition must not be mounted when mkfs is run.
Unless the device is specified in the fstab with one of the mount options user or users, mkfs must be run as root.
mkfs is noisy. The output consists of a progress report and the filesystem's parameters.
Filesystems can be identified later using one of three methods:
The label can be placed on the filesystem when it is created (using the -L label option above), or it can be added or changed using e2label:
e2label device [label]
Here e2label either outputs the current label on the device (if label is not specified) or relabels it.
We will discuss examining and/or changing the uuid on a
filesystem in the section on filesystem tuning.
Creating a filesystem
As an example, we refer back to the 20GB filesystem which served as the example partition we created. The situation is this: we already have a filesystem created on it using default parameters and the filesystem was mounted at /new. We want to recreate it with some different parameters. Here are the parameters of the current filesystem
Suppose we want to use this filesystem for CD ISO files. We will thus choose the option -T largefile4 to mke2fs to lessen the number of inodes created. First, unmount the filesystem
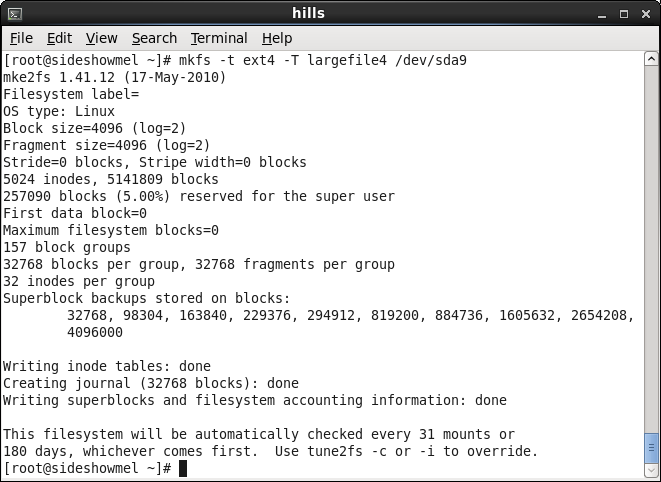
Then create the new filesystem using mkfs
Examine the output of mkfs above and gather the following information:
We have created this filesystem with a very small number of inodes. A total of 5024 directories and files can be created on it, since that's how many inodes there are. This was a dangerous decision, but if we really use it for ISO images, whose size is typically .5GB, we should be fine. (Note: you would rarely specify the ratio of inodes yourself, as the wasted space is small by comparison. We are simply doing it for illustration.)
We did not specify a label when we recreated the filesystem. However, the configuration for the filesystem in fstab refers to the filesystem by the label /new, so we must add the label using e2label. (The label specified in the fstab is the same as the mount point (/new)):
# umount /dev/sda9
# e2label /dev/sda9 /new
Now we are ready to mount it. We will cover the full syntax of the mount command later. Since we have the configuration entered in the fstab, we can simply specify the mount point to mount the filesystem.
# mount /new
Next we will compare its numbers of inodes
and disk blocks to the original filesystem.
Compare the numbers and see if you think reducing the number of inodes was worth the trouble.
A quick overview of these numbers indicates some inconsistencies: you would think that used + available should equal the total. It does not. The difference is 1028360 kB. This is just about 5% of 20564592, so there is the 5% reserved for root.
What is reflected in the 'used' quantity? We just created the filesystem. There should not be any space used yet! This used space is taken up by
The total for these three numbers is still about 128MB. This leaves about 40MB of space unaccounted for. This is filesystem bookkeeping space (free block lists, superblocks, and allocation bitmaps.) This bookkeeping overhead requirement is very small as a percentage of the overall filesystem space of 20GB.
The lost+found area
If you list our mounted filesystem, you find something surprising:
This lost+found directory is a repository for unreferenced inodes. It is used by the filesystem checking program fsck to save lost data if any is retrieved when the filesystem is analyzed. You should never delete this directory. We will discuss lost+found more in the section on checking the filesystem.
Resizing a filesystem
Resizing a filesystem using the command-line is very tricky, and,
although it can be done, it is rarely feasible. The issue is
always one
of increasing the filesystem's size, and this requires first
increasing
the partition size. If you are lucky enough to have free space
after
the partition, this is possible, but that is rather rare. In case
this
is the situation, or you can safely delete and move the next
partition,
we will go through the tools briefly. The filesystem must be
unmounted
before any resizing operation, and you should back up your data
first!
To increase the size of a filesystem you must first increase the size of the partition, keeping the current starting location. Once the partition size is increased you can use resize2fs to increase the size of the filesystem.
Note that I have little experience with resizing a real filesystem using these tools. Use them at your own risk.
If you are concerned that you may have to increase the size of your filesystems after the system is installed you may want to consider using the logical volume manager. It is much easier to increase the size of logical volumes than physical partitions.
We will revisit resize2fs
when we discuss the logical volume manager.
| Preview question: mount is used to attach the device containing a filesystem to the Unix filesystem at a directory. Using the df command, find out how many mounted filesystems where are on your system. Which is the largest? the smallest? |
| Prev | This page was made entirely
with free software on linux: the Mozilla Project and Openoffice.org |
Next |